AIRFOIL OF INFINITE SPAN IN INCOMPRESSIBLE FLOW (PROFILE THEORY)
2- 1 INTRODUCTION
In this chapter the airfoil of infinite span in incompressible flow will be discussed. The wing of finite span in incompressible flow will be the subject of Chap. 3, and the wing in compressible flow that of Chap. 4. More recent results and understanding of the aerodynamics of the wing profile are communicated in progress reports by, among others, Goldstein [19], Schlichting [56], and Hummel [26].
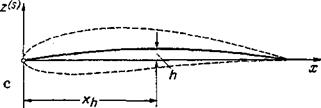
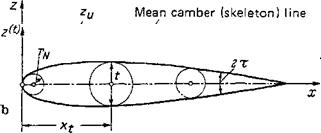
Wing profile The wing profile is understood to be the cross section of the wing perpendicular to the у axis. Accordingly, the profile lies in the xz plane and depends, in the general case, on the spanwise coordinate y. The geometry of a wing profile may be described, as in Fig. 2-1 a, by introducing the connecting line of the centers of the inscribed circles as the mean camber (or skeleton) line, and the line connecting the leading and trailing edges of the mean camber line as the chord. The greatest distance, measured along the chord, is called the wing or profile chord c. The largest diameter of the inscribed circles is designated as the profile thickness t (Fig. 2-1 b), and the greatest height of the mean camber line above the chord as the maximum camber h (Fig. 2-lc). The positions of the maximum thickness and the maximum camber are given by the distances xt (thickness position) and xh (camber position). The radius of the circle inscribed at the profile leading edge is taken as the nose radius rN it is usually related to the thickness. The trailing edge angle 2t

 |
Figure 2-1 Geometric terminology of lifting wing profiles, (a) Total profile, (jb) Profile teardrop (thickness distribution). (c) Mean camber (skeleton) line (camber height distribution).
(Fig. 2-16) is another important quantity. From these designated quantities the following six geometric profile parameters may be formed:
tjc relative thickness (thickness ratio)
h/c relative camber (camber ratio)[4]
xtjc relative thickness position
xhjc relative camber position
rNjc relative nose radius
2t trailing edge angle
For the complete description of a profile, the profile coordinates of the upper and lower surfaces, zu{x) and Z/(x), must also be known. A profile can be considered as originating from a mean camber line z^(x) on which is superimposed a thickness distribution (profile teardrop shape) z^x) > 0. For moderate thickness and moderate camber profiles, there results
zu, i(x) = z(sx) ± z(f)(x) (2-1)
The upper sign corresponds to the upper surface of the profile, and the lower sign to the lower surface.
For the following considerations, the dimensionless coordinates
X=- and Z = — (2-2)
c c
are introduced. The origin of coordinates, л: = 0, is thus found at the profile leading edge.
Of the large number of profiles heretofore developed, it is possible to discuss only a small selection in what follows. Further information is given by Riegels [50].
The first systematic investigation of profiles was undertaken at the Aerodynamic Research Institute of Gottingen from 1923 to 1927 on some 40 Joukowsky profiles [47]. The Joukowsky profiles are a two-parameter family of profiles that are designated by the thickness ratio t[c and the camber ratio h[c (see Sec. 2-2-3). The skeleton line is a circular arc and the trailing edge angle is zero (the profiles accordingly have a very sharp trailing edge).
The most significant and extensive profile systems were developed, beginning in 1933, at the NACA Research Laboratories in the United States.* Over the years the original NACA system was further developed [1].
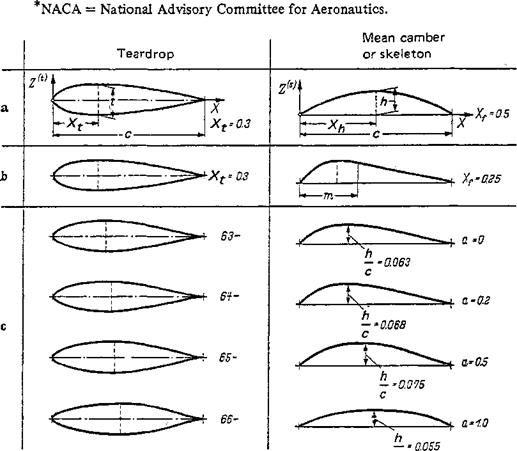
For the description of the four-digit NACA profiles (see Fig. 2-2a), a new parameter, the maximum camber position xh/c was introduced in addition to the thickness t/c and the camber hfc. The maximum thickness position is the same for all
|
c Figure 2-2 Geometry of the most important NACA profiles, (a) Four-digit profiles. (b) Five-digit profiles, (c) 6-series profiles. |
28 AERODYNAMICS OF THE WING profiles xtfc = 0.30. With the exception of the mean camber (skeleton) line for Xh = xh/c — 0.5, all skeleton lines undergo a curvature discontinuity at the location of maximum camber height. The mean camber line is represented by two connected parabolic arcs joined without a break at the position of the maximum camber.
For the five-digit NACA profiles (see Fig. 2-2b), the profile teardrop shape is equal to that of the four-digit NACA profiles. The relative camber position, however, is considerably smaller. A distinction is made between mean camber lines with and without inflection points. The mean camber lines without inflection points are composed of a parabola of the third degree in the forward section and a straight line in the rear section, connected at the station X—m without a curvature discontinuity.
In the NACA 6-profiles (see Fig. 2-2c), the profile teardrop shapes and the mean camber lines have been developed from purely aerodynamic considerations. The velocity distributions on the upper and lower surfaces were given in advance with a wide variation of the position of the velocity maximums. The maximum thickness position xtjc lies between 0.35 and 0.45. The standard mean camber line is calculated to possess a constant velocity distribution at both the upper and lower surfaces. Its shape is given by
g(s) = — — in 2[(1 — AT) In (1 —X) + ХЫ X] (2-3)
c
A particularly simple analytical expression for a profile thickness distribution, or a skeleton line, is given by the parabola Z = aX( 1 ~X). Specifically, the expressions for the parabolic biconvex profile and the parabolic mean camber line are
Z^X) = 2 — X(l — X) (24 a)
Z<-s)=4^X(l – X) (24b)
Here, t is the maximum thickness and h is the maximum camber height located at station X = .
The so-called extended parabolic profile is obtained by multiplication of the above equation with (1 + bX) in the numerator or denominator. According to
,Glauert [17], such a skeleton line has the form
/ I * *
‘.У: ?’Г/ ‘—————– -3 = aX( – m + ЬХ) (2-5)
Usually these are profiles with inflection points.
According to Truckenbrodt [49], the geometry of both the profile teardrop shape and the mean camber line can be given by
– ■■ X(l — X)
У……………. ^ Z{X) = a (2-6)
For the various values of b, this formula produces profiles without inflection points that have various values of the maximum thickness position and maximum camber position, respectively. The constants a and b are determined as follows:
|
Teardrop: |
1 t a 2Xf c |
l-2Xt b~ X2 |
(2-7 a) |
|
Skeleton: |
1 h a X2hc |
, 1 – 2Xa 4= XI |
(2-74) |
Of the profiles discussed above, the drop-shaped ones shown in Fig. 2-2 have a rounded nose, whereas those given mathematically by Eq. (2-6) in connection with Eq. (2-7a) have a pointed nose. The former profiles are therefore suited mainly for the subsonic speed range, and the latter profiles for the supersonic range.
Pressure distribution In addition to the total forces and moments, the distribution of local forces on the surface of the wing is frequently needed. As an example, in Fig. 2-3 the pressure distribution over the chord of an airfoil of infinite span is presented for various angles of attack. Shown is the dimensionless pressure coefficient
 |
|
|
|
![Подпись: with the profile NACA 2412 [12]. Reynolds number Re = 2.7 • IQ6. Mach number Ma = 0.15. Normal force coefficients according to the following table:](/img/3131/image059_2.png)
versus the dimensionless abscissa x/c. Here ip — Poo) is the positive or negative pressure difference to the pressure p„ of the undisturbed flow and, the dynamic pressure of the incident flow. At an angle of attack a = 17.9°, the flow is separated
|
cc |
-1.1° |
2.8° |
7.4° |
13.9° |
17.8° |
|
-CZ |
0.024 |
0.433 |
0.862 |
1.356 |
0.950 |
from the profile upper surface as indicated by the constant pressure over a wide range of the profile chord.
 |
 |
The pressures on the upper and lower surfaces of the profile are designated as pu and pi, respectively (see Fig. 2-3), and the difference Ар = (рг — pu) is a measure for the normal force dZ= A pb dx acting on the surface element dA = b dx (see Fig. 2-5). By integration over the airfoil chord, the total normal force becomes
where cz is the normal force coefficient from Eq. (1-21) (see Fig. 2-3). For small angles of attack a, the negative value of the normal force coefficient can be set equal to the lift coefficient cL:
 (2-10)
The pitching moment about the profile leading edge is
M=—b / Ap{x)dx (2-lla)
X)
= cMqaobc’1 (2-11 b)
where nose-up moments are considered as positive. The pitching-moment coefficient is, accordingly,
![]()
![]()
 (2-12)


