Category Helicopter Test and Evaluation

Speed course method

The level flight ASI pressure error can be determined by timing the aircraft over a measured course. The course length is chosen to give a data run lasting between 30 and 60 seconds. EAS is calculated from the measured ground speed, after allowing for wind, pressure and temperature, and this is compared with the aircraft IAS. This method may be used at low altitude using visual timing or at high altitude using radar tracking or Doppler to measure the ground speed. Although the low level visual method is used at most test establishments it is reserved for level runs and requires a surveyed and marked ground course, and a stopwatch. It is highly desirable to locate an anemometer in the centre or, preferably, at each end of the course so that local winds can be noted. If timing back-up is to be provided by ground personnel then a radio link is usually employed. Alternatively radar tracking, Doppler or electronic

timing may be employed. Where possible a trace recording of the airspeed flown is used to determine the accuracy of the trim state of the subject helicopter.

Obtaining quality data from the speed course method requires that the helicopter be accurately timed over a course of known length whilst being flown accurately ( + 1 kts and +20 ft). If the course is flown in both directions a correction can be made for the wind (assuming it was of consistently low strength and constant direction) by averaging the ground speed for each run. This speed is then assumed to equal TAS. Errors are minimized by selecting a course that is oriented into the local wind. If a steady crosswind is unavoidable, the aircraft heading is maintained along the course track and the aircraft allowed to drift. If the heading were continually altered to ensure that the ground track matched the speed course then during the test the helicopter would be subjected to undefined amounts of sideslip which would affect the accuracy of the PE measurement. Sometimes it is necessary to displace the aircraft upwind of the start of the course to ensure that the lateral displacement from the end of the course is not excessive and accurate timing can still be accomplished.

Accurate results rely on both ground and aircrew observers avoiding timing errors due to parallax. In the aircraft this is typically achieved by sighting the ground markers across the same two fixed points on the airframe (the bottom of the instrument panel and a window frame for example). Longer course lengths should produce greater accuracy but, in practice, the optimum length for a test will depend upon the ease with which a constant IAS can be maintained. In calm conditions, this will depend upon the overall flying qualities of the helicopter. For the stopwatch and ground markers technique, a course length which gives a run time of approximately 1 minute is employed, providing the test IAS can be held to within +1 kts (brief excursions to + 2 kts are usually acceptable). Pilot workload and fatigue may be reduced by accepting shorter run times, down to 30 seconds, if difficulty is experienced in sustaining a stable condition. Obviously, calm conditions are desirable but acceptable results have been obtained in steady wind speeds up to 10 kts. Turbulence must be avoided and therefore, depending on the ground clutter around the speed course, flight with a crosswind component may be precluded. The ground course can be overflown at any height but between 50 ft and 200 ft is usually recommended. At lower heights timing errors may be introduced due to the short time that the marker is within the timer’s field of view and there may also be additional pressure errors due to ground effect. Above 200 ft parallax errors often become too significant. Despite operating at a height within the range of typical radio altimeters it is usual for the pilot to maintain height with reference to the barometric altimeter. This is because the pitot-static system is the system under test and use of a radio altimeter may introduce additional errors as the pilot attempts follow undulating ground.

Post-flight data reduction is relatively straightforward. First the airspeed indicator reading (ASIR) is corrected for instrument error to yield the IAS:

V = ASIR + instrument error

Then the timing for the two runs (upwind and downwind) are converted to ground speed, which is assumed to equal the true airspeed:

Подпись:D D

T + T

-l up х dn

Using knowledge of the air temperature and static pressure at the altitude of the test aircraft, the equivalent airspeed is determined. This is assumed to equal the calibrated airspeed since the scale altitude correction is usually zero for rotorcraft operating at low level:

Vc = Ve =

Finally the ASI pressure error is found by subtracting V from Vc.

Tower fly-by or aneroid method

The tower fly-by method is used to determine the altimeter pressure errors by comparing the cockpit indication with an external measurement of the aircraft’s true pressure altitude. This altitude is found by the summation of the pressure altitude of a fixed datum (base or top of the tower) with the tapeline height of the aircraft above that datum suitably converted to a pressure height. Aircraft height may be measured using a calib­rated radar altimeter, a space-positioning system (such as kinetheodolites) or photo­graphically. The method can be improved by connecting a sensitive aneroid to the static system of the aircraft thus identifying errors associated with the cockpit instrument. Care needs to be exercised when handling these aneroids as they are often capable of only tolerating a small altitude range above sea-level and are susceptible to aircraft vibration. Using a radar altimeter is a simple technique that can be used when pre-surveyed facili­ties are not available. Care must be taken to eliminate the effects of lag and the helicopter should be flown over a smooth level surface to avoid transient errors.

The actual tower fly-by method is normally only used for level flight and hover testing. The aircraft is flown a pre-determined distance from the tower, perhaps down a runway centreline, and is photographed just as it passes the tower. A grid superim­posed on the photograph allows determination of the aircraft height. It is common practice for aircraft conducting fly-by testing to have the vertical position of the static ports and any associated transducers or instruments clearly marked as an aid to calculating the true height of the aircraft. Space-positioning equipment may be employed during steady climbs and descents provided a means of synchronizing the data taken in the air and on the ground is available.

Fly-bys are conducted throughout the speed range of the helicopter. It is important that the flight condition is stabilized before data is gathered. Thus an adequate run-in distance must be allowed so that the test height and airspeed can be well stabilized before the instant of measurement. If photography is being used it is important that the aircraft is flown at the correct horizontal distance from the tower otherwise trigonometric errors will be introduced during interpretation of the photographs. As the helicopter approaches a position opposite the reference point the observer in the aircraft records the altimeter reading and radar altimeter indication if appropriate. At the same time a ground observer, at the reference point, notes the static pressure reading from a sensitive aneroid, and photographs the helicopter. A radio link is therefore highly desirable. Both observers keep a record of the runs made so that the test results can be matched at the end of the flight. The aircraft OAT and fuel state should be recorded at the beginning and end of each series of runs. At low IAS singled-engined helicopters may well be operating well inside the avoid curve so time spent in such a condition should be minimized. Tower fly-bys frequently involve use of the primary runway at test establishments and therefore close co-ordination with other activities is required to minimize the risk. As stable weather conditions (low wind and absence of thermal activity or turblence) are a must for accurate testing it is quite often necessary to perform tower fly-bys at dawn or dusk thus easing the problem of deconfliction with other air traffic.

Post-flight data reduction usually uses the convention of relating all the data to the same reference height. Thus the altimeter pressure error is obtained by subtracting the pressure altitude observed in the aircraft, corrected to the reference height, from the pressure altitude of the reference point itself:

*hP = reference pressure altitude — corrected aircraft pressure altitude

Typically the aneroid placed in the aircraft is compared with a similar device placed at the reference height. Obviously each individual aneroid will have a calibration curve that relates the gauge indications to corrected pressure altitudes and these are applied before the pressure error is determined. Errors due to mechanical differences between the aneroids are removed by taking readings from each aneroid when at the same height before and after the test. This so-called ground correction is added to the pressure altitudes recorded in the aircraft:

aircraft pressure altitude = corrected aneroid reading + ground correction

= hpa + (hpr hpa

Although the pilot will endeavour to fly past the tower at the correct height there will often be a small tapeline error, Zc. This error is quantified photographically and if the aircraft is above the camera datum the error will be added. It is important that the tapeline error, or the error plus the height of the tower if the ground aneroid was placed at its base, is converted to a pressure height before the altimeter PE is determined. The correction is achieved by noting the temperature of the air at the reference height and ratioing the tapeline height using the sea-level temperature on the day of the test, assuming an ISA lapse rate, and the ISA sea-level temperature of

288.15 K. Thus:

*hP = hPi — (aircraft pressure altitude

+ pressure height of aircraft above reference point)

Подпись: *hp — hp Подпись: hpa + (hpr Tower fly-by or aneroid method

= hpr ——— [hpa + (hpr ————- hpa )g + hpc ]

where Tc is the temperature recorded at the reference point on the day of the test and Sc is the temperature difference between the reference point and MSL, assuming a standard lapse rate.

PRESSURE ERROR MEASUREMENT

7.3.1 Sources of pressure error

The altimeter, airspeed indicator and vertical speed indicator are designed on the assumption that they are fed with pressures from the undisturbed freestream. However, as a helicopter flies it disturbs the air mass and in so doing generates a pressure field around the vehicle. In addition to true airspeed this pressure field is affected by factors such as: the downwash from the main rotor, the carriage of external stores, and the configuration of hatches, doors and movable weapons. Since it is common practice to use either a fixed pitot-static probe or a fixed pitot probe with a fuselage mounted static source then errors in measured air data will also arise as a consequence of sustained or transient changes in the angles of attack and sideslip of the fuselage. These changes can be caused by:

• low-speed out-of-wind manoeuvres, transitions, turns, climbs or descents;

• variations in all-up-mass (AUM) and centre of gravity (CG);

• carriage of underslung loads;

• operation of movable aerodynamic surfaces.

Errors associated with feeding pressures, other than the freestream values, to the pitot-static system are called pressure errors. The action of the main rotor and the large fuselage angles of attack and sideslip that are commonplace in helicopter operation can cause errors in both total and static pressures. Whereas a static pressure error (APS) is applicable to both the ASI and the altimeter, a pitot (or total) pressure error (APP) is applicable to the ASI only.

Although there are several different methods for determining pressure errors they fall into either of two distinct groups. Those that compare the aircraft instrument readings with air data obtained from the actual freestream conditions in the vicinity of the aircraft, and those that make a comparison between aircraft instrument readings and data from independent external sources. Pressure errors are measured for a number of reasons and at various times during the life of an aircraft. During development, tests are made to determine the best position for the pitot head(s) and static vent(s) to minimize the errors over the full flight envelope of the helicopter. Due to the complexity of the flow field around the fuselage of a typical rotorcraft this is usually accomplished by fitting several probes and vents and by comparison selecting the location(s) that generate the smallest pressure errors. Prior to release to service formal trials are conducted to obtain data for publication in operating manuals and aircrew manuals so that the rotorcraft can be operated safely with changes in CG, AUM, rotor speed, power and external configuration. Knowledge of the pressure errors will be required to convert any true airspeed or pressure altitude restrictions into limits based on cockpit indications. Likewise, special operating techniques may be necessary to compensate for excessive pressure errors. Detailed knowledge of the pressure errors is also a pre-requisite for other flight tests such as performance evaluations and stability testing. Later in the service life of the rotorcraft, if external store configurations other than those originally fielded are considered, it may be necessary to re-evaluate the pressure errors.

Warning and alerting systems

The most important aspect of evaluating warning and alerting systems is to determine the effectiveness of the system in capturing the attention of the crew in a timely and appropriate manner. An effective warning will posses adequate attention-getting qualities so that it can gain the crew’s attention even during high workload situations where there may be little surplus mental capacity to register new information. In rotorcraft the main means of providing warnings is by lights usually on a centralized warning panel (CWP). The effectiveness of these illuminated warnings depends on factors such as the intensity of illumination, the position of the CWP in relation to the pilot’s normal field of regard, and the size of the light. Often separate lights known as ‘attention getters’ are used to increase the chances of capturing the crew’s attention and causing them to look at the CWP. Warning lights may be placed on the instrument of interest as is the case of the Aerospatiale Gazelle overtorque warning. To test the effectiveness of warning lights the aircraft is operated under a range of lighting conditions and, in particular, with bright sunlight on the instrument panel. The conversion of some aircraft to NVG compatibility has caused problems with filters being placed over CWPs resulting in poor daylight readability. Testing the suitability of the position of warning lights ideally involves unannounced illuminations during high workload tasks.

All warnings should be appropriate to the emergency or malfunction that they indicate. Major warnings requiring immediate intervention by the pilot are normally coloured red and are often supplemented with audio tones while lesser warnings are indicated by an amber colour. Advisory lights are usually coloured blue or green. Where warnings are used to indicate the approach of a limit it should activate sufficiently early to aid the pilot in respecting the limit. Audio warnings are checked to ensure that they can be heard even when radio calls are being received and crew members are talking over the intercom. If multiple audio warnings are fitted then the system of allocating priority is checked.

Night lighting assessment

Very few helicopters are restricted to operations purely during daylight hours therefore assessing the efficiency of the internal lighting arrangement forms an important part of any cockpit evaluation. Illumination is provided in the cockpit to assist the pilot to locate and identify switches and controls in addition to allowing information to be read from cockpit instruments and displays. However it must be remembered that in most tasks the pilot’s primary visual task will involve looking outside the cockpit for external references and the internal lighting should not make this more difficult. The assessment method for night lighting follows the normal cockpit assessment process of conducting a ground evaluation first and then moving on to airborne evaluations. The ground assessment can be conducted using covers to create a fully dark cockpit but further flight assessments under a range of ambient light conditions are essential.

The first task conducted on a night lighting assessment is an evaluation of the illumination of all controls and instruments. Floodlighting often leads to parts of the cockpit being completely in shadow or at best poorly illuminated. Even a small shadow across an instrument can cause problems in extracting information from it. The difficulty of providing balanced and well-controlled illumination can even result in some instruments and controls not being illuminated at all.

The next considerations are control and balance of lighting. With control the designer has to match two opposing requirements. Ideally the pilot would like to be able to control the intensity of illumination for every switch, control and instrument individually to ensure an even balance. On the other hand this would make it difficult and time consuming to switch the lighting on and off and to set the required intensity. The universal solution to this problem is to group lights onto lighting circuits each controlled by a single switch. These groups can be arranged either by cockpit location, such as the complete overhead console, or by function, such as the engine controls. If the balance of lights across a group is not correct it can be problematic; either the brightest instrument can be at the right intensity and the dimmest unreadable or the dimmest readable and the brightest distracting. The balance of lighting is checked to ensure that it is even across individual instruments. The precision with which lights can be controlled is also important as the aircraft will have to be operated in the whole spectrum of environmental light conditions from brightly lit dispersals to near complete darkness. For lights that perform a warning or advisory function it will normally not be advisable to allow the pilot full control over the intensity as it could lead to the light being dimmed to the extent that it cannot be seen.

A major problem with cockpit illumination is unwanted reflections from the variety of internal lighting sources. The position of these reflections is determined and if they cannot be eliminated completely then a judgement is made on the effect they will have during the operational role. External lights such as landing lamps can also create reflection problems. Although not part of a cockpit assessment the effectiveness and control of external lights is usually evaluated during the night lighting assessment.

The provision of lighting during emergencies and following system malfunctions is also assessed. Items such as door jettison handles require luminous markers to be placed on them to provide illumination that is totally independent of the aircraft electrical system. The lighting for critical instruments and displays should not be dependent on the electrical generation system but should be on a busbar supplied directly from an aircraft battery.

The first stage in the testing process is to conduct a failure modes, effects and criticality analysis to determine where problems may lie. The next stage, which is conducted on the ground, is to physically fail or deselect the electrical supply. This is done even if a failure modes analysis indicates that there will be no problem. Following ground tests a carefully planned airborne test is conducted in an incremental manner. The test pilot ensures that the items illuminated and the intensity of illumination are satisfactory for all possible conditions and tasks. During the lighting assessment consideration is also given to engine starting where the power drain on the battery may lead to loss of effective lighting for the engine instruments.

The provision of utility lighting for illuminating piloting documentation such as maps, kneeboards and checklists is also considered. This illumination is usually achieved through ‘wander lamps’ or ‘stalk lights’. Assessment criteria here are control­lability, effectiveness and rigidity once adjusted to a position. Checks are made that stalk lights cannot be placed in a position where they could interfere with the flight controls.

Electronic cockpit displays

As in all new aircraft, helicopter cockpits are increasingly incorporating electronic displays in place of mechanical, analogue dials. These can range from large multi­function displays (MFD) used to present flight information to small light emitting diode (LED) displays for an individual parameter. The electronic display offers a number of advantages over the mechanical dial, such as reduced maintenance costs, flexibility, clarity, and significantly smaller space requirements. The considerations for the display of information already stated in this section apply equally to electronic displays, however, there are a number of specific considerations that must be included in any assessment of these more modern instruments.

As the designer can place information on an MFD very easily there are sometimes problems with size and clutter. Each individual number, letter and symbol must be large enough to be distinguished easily and quickly. In addition the pilot must be able to locate and identify the parameter required with rapidity and with precision. Some MFDs provide a great deal of information in a very small space but do not reduce the pilot’s workload. When assessing these types of displays an important element is determining if the size and number of display elements helps or hinders the presentation of essential information for each phase of the mission.

There are a number of steps that the designer can take to improve this situation. Firstly the crew can be given some control over the displays to select the items of information they would like presented. Clearly this brings its own problems and will require the test pilot to check that essential information is never missing. Another approach commonly used in modern aircraft is the ‘black cockpit’. In this the pilot is only given information on items such as system status when he or she selects it or if the system detects an unusual change in a parameter. For example, engine oil pressure would not be displayed if the value lay within a pre-determined band and the rate of change was below a certain value. Thus by reducing the total amount of information presented and automating the systems monitoring task the designer can reduce the crew’s workload. Many pilots have resisted this approach, however, preferring instead to decide for themselves what to monitor and believing that they are better at detecting subtle changes in system status than an automated system. Another solution to a surfeit of information is to automatically de-clutter a display in certain circumstances. For instance heading and navigational information can be removed from a primary flight display if the helicopter attitude exceeds a certain value. This allows the pilot to concentrate on attitude information to effect a recovery to a normal flight condition.

The presentation format also requires careful assessment. Unlike conventional instruments the electronic display gives the manufacturer an almost infinite number of ways to present information. It is important that the manufacturer chooses the optimum format and it is often in this area that the test pilot with an extensive knowledge of the role requirements can make a significant contribution. The display format should not merely reproduce conventional instruments in electronic form but should also employ the greater flexibility offered by this technology. For example, airliners such as the A320 provide trend arrows showing the predicted airspeed in 10 seconds in addition to airspeed limit markings that change with aircraft configuration. The provision of flight path vector information is another common example. Many electronic displays use digital formats to present numerical information. This type of presentation has the advantage of providing information to a high degree of accuracy and does not require the pilot to interpret a pointer position. However, these displays are very poor at presenting trends as the pilot has to interpret rapidly changing numbers. Data sampling rates can also pose problems. If this is set too high the presentation will be changing constantly, if it is set too low then it will introduce significant lag. Sometimes cockpit designers will combine digital displays with other

displays to attempt to get the advantages of greater accuracy but without the disadvantages of poor trend information. One example of this is the VIDS display in the Sikorsky Hawk (UH/SH-60) family of helicopters which uses strips of coloured LEDs together with digital displays at the top of each strip. Unfortunately strip instruments themselves are poor at displaying rate of change information. When assessing any display format, but especially digital or strip formats, conducting tasks that result in rapidly changing parameters is always important.

Any evaluation of electronic displays also includes an assessment of the appro­priateness of the information displayed. The greater flexibility offered by these displays should be utilized to reduce the pilot’s workload by displaying information that is appropriate to the flight phase or mission task that the aircraft is in. Perhaps the best example of this approach again comes from the civil airliner world in the form of the Airbus aircraft. The A320 for instance automatically displays different systems pages depending on cabin door position, engine condition, airspeed, etc. System malfunctions result in the display of the appropriate systems page and automated checklists. A rotary example comes from the Merlin helicopter where raising the sonar body changes the cable angle display to a Doppler hover presentation. In all cases the test pilot uses his or her experience of the role to decide if the designer has produced the most appropriate display. Where displayed limitations change with aircraft state it is important that the change happens quickly. On some helicopters it has been found that the more restrictive Power-On rotor limits do not change quickly enough to the Power-Off limits when entering FIG leading to spurious NR overspeed warnings.

Arguably the most important consideration when dealing with electronic displays is the ease with which the pilot can see the information presented. This will be affected by a number of factors such as viewing angle, colours used, contrast ratio, refresh rate, and display brightness. With the earlier type of LCD the viewing angle could present problems for centrally mounted displays in aircraft with side-by-side seating. This has become less of a problem with active matrix LCDs. Colour is used extensively in cockpit displays both to present information and to warn or advise of changes in state such as entering a 5-minute rating band or arming of a missile. During an evaluation the appropriateness of the colours used is determined. Using colours to alert the pilot to approaching limits may not always be enough. On the EHI Merlin, for example, it was found that despite changing the torque display to red at high torque values a master caution caption had to be added to provide greater attention-getting qualities. All civil airworthiness authorities dictate which colours are permitted on flight displays and define the appropriate purpose for each colour. This ensures commonality on civil aircraft. Night operations can be a critical area for colour displays as, with the brightness dimmed down, a display that is satisfactory during daylight may be unsatisfactory at night. This is due to the colours becoming indistinct at low intensity and therefore any night evaluation concentrates on areas where colour is used as a primary source of information. The brightness of a display is assessed in the full range of lighting conditions including direct sunlight. In addition the control of brightness is checked. Associated with the overall display brightness is the contrast ratio, this is the ratio between the luminance of any display element and the background. The contrast ratio should be such that throughout the range of available screen brightness it is possible to identify the individual elements quickly and easily.

Display of information

Having looked at the factors concerning the way the pilot is able to control the aircraft systems the next major area to consider is the way that information is displayed to the aircrew. Although the human being is extremely adept at processing large amounts of information quickly, pilots often reach saturation point in flight where the amount of information and the way it is presented make it difficult for him or her to analyze it. The type of information the pilot is required to receive and process is extremely varied. He or she must constantly monitor the aircraft’s state in relation to the external environment encompassing such factors as velocities in all axes, altitude or height, separation from obstacles, heading and attitudes, etc. This may need to be achieved using external cues, instrument displays or most commonly a combination of both. In addition all the aircraft systems need to be monitored, some, such as the transmission torque and rotor speed, may require careful attention during manoeuvring. On top of all this there may be a requirement to take in and act upon the information presented on tactical and navigation displays.

There are a number of factors that affect the precision and speed with which the pilot is able to obtain and process the information presented on the aircraft displays. Instruments need to be positioned within the pilot’s normal field of regard (the area of the cockpit that the pilot is normally viewing) so that they can be seen easily when operating the aircraft. In addition, the position of the instruments in relation to each other is an important factor. The pilot will often have to obtain information from several systems in a short space of time to perform a task such as starting an engine or performing an autorotation; a poor instrument layout will add significantly to the difficulty of the task. Associated with the position of instruments is the ease with which the correct instrument can be located and identified. If all instruments are of the same size and general appearance then it can be difficult to find the correct instrument quickly, particularly if there is no logical structure to the layout. Even worse, the pilot may misidentify the instrument during the stress of an emergency and shut down a serviceable system. Thus instruments must be easy to view and identify while conducting role tasks.

The instruments used for controlling the flight path of the aircraft are the most important instruments in the cockpit and therefore their layout has come in for particular study. Because of their importance they are always given the most prominent position on the instrument panel directly in front of the pilot. Following the example of their fixed wing predecessors the flight instruments of nearly all helicopters are arranged in the classic ‘T’ layout which puts the artificial horizon or attitude indicator (AI) in the centre with the directional indicator below. The airspeed indicator is located to the left of the AI and the altimeter to the right. This arrangement is usually laid down in specification documents, such as the Ministry of Defence Standard [7.2] and Joint Airworthiness Requirements [7.6]. Other instruments such as the vertical speed indicator and the radar altimeter are located below the ‘arms’ of the ‘T’. This layout allows the pilot to build a viewing strategy known as a ‘scan’ that is centred on the AI; each instrument is scanned in turn with a scan of the AI in between. Thus when flying solely by reference to instruments the pilot is able to monitor the most important of all parameters, the aircraft attitude, frequently enough to prevent minor deviations from becoming larger errors.

The suitability of the layout of the flight instruments will naturally be affected by the requirements of the role. For example, an aircraft that is required to operate at night, low level over the sea will need radar height displayed more prominently than barometric height. For this reason some naval helicopters, such as the Westland Sea King, have the radar altimeter positioned in the place normally reserved for the barometric altimeter.

The position and distinctiveness of instruments is only part of the story. The pilot must also be able to interpret the information displayed easily and for this the size, markings and scales used must all be correct. The ease with which the pilot is able to interpret the information displayed by an instrument is often referred to as ‘readability’. The effect that size has on readability needs little amplification but when assessing the size of an instrument consideration must be given to the distance it is from the pilot’s eye, the frequency with which the pilot will need to interrogate it, and the precision with which information will need to be gathered. During an instrument approach, for example, the pilot will need to monitor the direction indicator frequently and to an accuracy of one or two degrees. This is in contrast to an oil temperature gauge that will need only infrequent scanning with far less precision.

The markings and scales used on instruments can be a more complex aspect of assessment as they are dependent on the way in which the pilot is required to use the information presented. For example, when considering a gauge displaying rotor speed (NR) it is clear that the pilot will be interested primarily in that portion of the scale which relates to rotor speeds that will be seen in flight. If the full range of rotor speed is shown on the gauge from zero to the maximum permitted, the size of the portion corresponding to flight values is likely to be very small. This problem is sometimes tackled by using scales with expanded portions as in the case of radar altimeters where the scale is larger at low altitudes where greater precision is required. The test pilot must make the decision as to whether or not the choice of scale provided is the optimum for all mission tasks. Care must also be taken with non-uniform scales to ensure that rate of change information on the parameter displayed does not lead to confusion as a constant rate of change will not lead to a uniform rate of pointer movement.

Anthropometrical considerations

When designing a cockpit the manufacturer needs to ensure that the pilot can be seated comfortably, can reach all the required controls and can fit through the normal and emergency entry and exit routes. This presents a considerable challenge to the designer because of the extreme variability of the human body. None of us are identical (some twins excepted!) and even when individuals are of the same height they may have very different measurements for body parts such as thigh length, functional reach, etc. A considerable amount of research has been conducted into the anthropometrical measurements of pilots. For example, surveys have been conducted of RAF aircrew [7.3 and 7.4] and these have been used as the basis for the design requirements of UK military aircraft [7.1 and 7.5]. It is worth noting that there is also considerable variation between different groups in a population, and between the populations of different countries so that cockpits designed to suit the mean of one ethnic group may not be ideal for another.

The designer could use the average measurements of the intended pilot population for each body part in his calculations. This would be better than designing for one or other extreme of size but would still mean that pilots larger or smaller than the average (in effect just about everyone!) would have difficulty in fitting into the cockpit or reaching the controls. To overcome this problem the designer usually provides a range of movement for the seat and yaw pedals. On some occasions an extreme percentile determines the design, for example the door opening must allow the largest pilots to fit through. The range of sizes that the designer must cater for has increased in recent years as more women, who are generally smaller, have entered the previously exclusive domain of male pilots.

7.2.3 Controls

The helicopter cockpit incorporates a plethora of switches and controls, each of which must be designed carefully to assist the pilot when operating the aircraft. Switches must be easy to locate, identify and operate under all conditions. There are a number of means at the disposal of the manufacturer to achieve these design aims. Switches can be grouped together by function, such as locating all electrical controls on a single panel. Alternatively they may be grouped according to task, such as having all the controls required for engine start located together and arranged in the order in which they will be used. The frequency with which a control is used is also a factor in deciding its location, so that frequently used items are located where they can be operated by the pilot most easily. Less commonly used items can then be located in the less convenient positions, however, some infrequently used controls are of great importance and must therefore be particularly easy to locate. Controls associated with emergency actions are the prime examples of this. For example, fuel cut-off levers and engine fire extinguisher buttons may be used only very rarely but must be as easy as possible to locate, identify and operate in the case of an emergency.

Identifying the function of a switch or control and identifying the purpose of its selection positions are important aspects of design and assessment. The pilot must be able to identify a control quickly and accurately even when he or she is tired, busy or frightened. Furthermore the effect of selecting each position on the switch or control must be immediately apparent. To achieve these aims, switches and controls have to have correct labelling which can be read under all circumstances. For example, if the aircraft is to be operated at night the labels must have adequate illumination. It is also often necessary to provide more feedback about the status of a selected system than merely the position of a switch. This can take the form of lights or indicators to show that the system has been selected and is operating. The marking of controls associated with emergency actions such as door jettison handles and an underslung load jettison switch is an area where clear marking is essential. For this reason all specification documents that cover cockpit layout lay down in some detail the size, colours and position of markings for these controls.

The designer must give the pilot control over all the aircraft systems which means that he or she can close down engines, discharge fire extinguishers, disengage flight computers and jettison parts of the aircraft or its cargo. Clearly a lot of design effort must be made to ensure that these events only happen intentionally. Aviation history is littered with examples of aircrews who have made inadvertent or incorrect switch operations, often with disastrous results. There are a number of steps that can be taken to minimize the chances of this happening. Where inadvertent operation is likely to have a serious consequence controls may be provided with gates or guards which require a conscious action to release or pass and operate the control. Electrical interlinks to disable a switch if the system configuration is not correct can also be employed, such as weight-on-wheels switches to disable undercarriage selectors when the aircraft is on the ground. Other methods of minimizing inadvertent operation include covers, catches, recessing, wire locking or any combination of these.

Designers can also ensure that it is easy to discriminate between switches by using different shapes, colours, sizes and even textures. A cockpit full of identical switches may look good in the manufacturer’s brochure but it will spell disaster for the operational pilot. A good example of the use of shapes is the Westland Sea King autotransition panel, which employs a triangle, a cross and a bar to allow discrimina­tion between three controls at night.

The distance between controls and their method of operation are also important factors that must be considered. For example, locating a heater control next to a fuel jettison lever would clearly not be sensible particularly if both controls operated in the same sense.

A well designed system will give immediate feedback of the system status independent of switch position. For example, if a fuel boost pump is selected on, an indicator could change from red to show a white line completing that part of the fuel system schematic. On a less sophisticated system the pilot has to use the selection position of the switch itself to gain information about the system status. This can add significantly to the pilot’s workload and can also lead to errors, particularly for switches with multiple selections and those located further away from the pilot. Illumination of remote or integral lights and the use of indicators are the most common way of achieving status feedback.

Entry and exit

A logical place to start any cockpit assessment is with the entry and exit. The aim of this part of the evaluation is to determine the ease and safety with which the crew can enter the cockpit and also exit it under both normal and emergency conditions. As always a vital consideration is the way that the aircraft is likely to be operated. For example, if operations from field sites are likely then the effect of crews having wet and muddy footwear is considered. Similarly the effect of deck motion is taken into account when evaluating a naval rotorcraft. A slip by a crew member could result in injury or possible interference with the flight controls during rotors running entries and exits which could be disastrous. The security of the cockpit door when opened and the ease of controlling the rate of closure in high winds are also checked. When presenting the results of these tests the actions the pilot took when entering and exiting his or her station are described in some detail; photographs are often the best supporting data.

Exiting the cockpit in an emergency can literally be a matter of life and death to operational crews and therefore a thorough assessment is made in this area. From a normal seated position with the safety harness locked a simulated egress is made and timed. Any difficulty with operating the jettison control or any danger of becoming snagged on items in the cockpit is recorded. It should be remembered that following an accident the fuselage may come to rest on its side or roof and egress under these conditions is considered. For example, if a large, side-by-side seat aircraft comes to rest on its side, the crew member in the lower position may have difficulty reaching an available exit. In the case of ditching it is important that a handhold is provided at the exit to allow the pilot to remain orientated without visual cues. The force required to operate jettison controls is measured using spring balances; these forces should be light enough to allow easy operation under all conditions, even under water for example. It is essential that all controls can be operated with a single hand. Emergency ingress facilities should also be provided so that ground personnel are able to gain access to the cockpit in order to rescue an injured crew member. In a utility helicopter the safety of the passengers must not be forgotten and due consideration is given to entry and exit from the cabin.

7.2.2 Field of view

Documenting and assessing the field of view (FOV) available from the pilot’s station is an integral part of a full cockpit assessment. The FOV is measured from the aircraft design eye position (DEP) which is the point in space where the manufacturer expected the pilot’s eyes to be. The manufacturer will have designed the entire cockpit around this point so that the pilot should be able to see all the necessary items in the cockpit as well as having the best possible view of external references. Where a DEP is not available another point, known as the reference eye position (REP), is nominated from which all measurements are made. This will be the point where the assessing pilot’s eyes are with the seat adjusted to his or her normal position for flight.

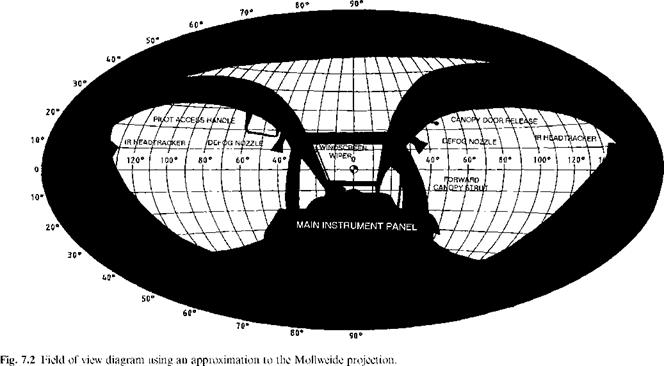
Measuring the FOV involves measuring the angular position of obstructions from the DEP or REP in both azimuth and elevation and then recording this information on a chart. As each measurement is added to the chart a picture of the obstructions to the pilot’s FOV is built up. There are two main ways of presenting the FOV. The first type, shown in Fig. 7.2, employs an approximation to the Mollweide projection [7.1] and is the most commonly used presentation as it contains all the measurements made during the test and can show exactly which cockpit items are causing obstruc­tions. It also has the advantage that the total area of obstruction can be seen at a glance. This type of presentation does have the disadvantage that it can be difficult to interpret, especially for people who do not have experience of using such charts. The second type of presentation uses a photograph using a fish-eye lens taken from the REP or DEP. The first stage when conducting the assessment is to determine the REP if a DEP is not available. For this the pilot sits in the seat which has been adjusted to his or her normal flight position. Then a marker is hung from the roof or canopy such that it is positioned between the pilot’s eyes. A minimum of three, ideally othogonal, measurements are made from fixed parts of the cockpit structure to the REP to define the point for recording in a report. A mark is then made on the forward transparency, parallel to the fore and aft axis of the aircraft and in line with the REP. This mark is used as the zero degree of azimuth point. From the REP marker, the angles to obstructions in both azimuth and elevation are measured using an inclinometer and a protractor.

Measuring the FOV on the ground provides quantitative data to support the test pilot’s qualitative opinion of the FOV during role manoeuvres: it is this latter part of the assessment process that is the more important of the two. The UK Defence Standard 00-970 [7.2] contains guidance on the minimum standards. It is extremely rare that a test programme includes dedicated flights purely to assess the FOV, therefore the test pilot has to evaluate this aspect during all test flights.

The aircraft designer faces a dilemma when planning the cockpit as he or she needs to accommodate all the controls, displays, sights, etc., but in addition must provide the pilot with the best possible view in each direction. It is worth remembering that unlike conventional aeroplanes, helicopters are not restricted to keeping the flight path close to the longitudinal axis of the aircraft and this increases the importance of having a good all-round FOV. A poor FOV can have a major influence on the operational pilot when conducting role tasks, as it will affect every manoeuvre that he or she makes. The FOV requirements of an aircraft will in turn be dependent on the role of the aircraft. For instance an attack helicopter that operates at high speed close to the ground will require a much better all-round FOV than an anti-submarine naval

image181

Подпись: Systems Testing 301

helicopter. However, the naval helicopter will still require a good FOV in certain arcs to allow the pilot to judge his position and relative motion to the deck when landing on a ship. Problems with the FOV often arise when a helicopter has not been designed for the specific role in which it is used. During many mission tasks the FOV may be the factor which limits the aggression and speed with which the task can be completed.

Once the FOV of an aircraft has been assessed on its initial entry to service there is a continuing requirement to conduct re-assessments whenever the cockpit is modified. Over the life of an aircraft these cockpit modifications can be very significant and invariably they result in a deterioration of the FOV rather than an improvement. Even if the FOV does not change it is often the case that the role of the aircraft or the way in which it is employed will change requiring a re-assessment to be conducted.

COCKPITS

It is hard to overestimate the importance that the design of the cockpit has on a pilot’s perception of the qualities of a helicopter. It is not only the place where the pilot is accommodated but is also where he or she exercises control over the craft and all its systems. In addition all sources of information from both the aircraft itself and the external environment find their focus in the cockpit. Like early aeroplanes the first helicopters had very simple cockpits with little more than the flight controls, some basic instruments and simple engine controls. As the number of systems that the pilot had to interact with grew, helicopter cockpits became complex areas of controls and instruments. It is true to say that the ergonomic aspects of design have not always been addressed with the importance that they deserve and as a result rotary-wing pilots have had to cope with major deficiencies in the design of their cockpits.

7.2.1 Assessment methods

When assessing a cockpit as a whole or any individual part of it, it is vital to keep the role of the aircraft firmly in mind at all times. Clearly this requires a detailed knowledge of the role and precisely how operational crews will conduct each aspect of the mission. There are two distinct approaches to conducting the assessment, both of which are taken in a full evaluation.

Initially each item in the cockpit is evaluated individually. Gauges are checked for size, markings, location, etc., while each switch is tested for ease of operation, labelling, provision of guards against inadvertent operation, and so on.

The second and more important approach is to conduct the assessment in the context of a realistic mission. This will discover if the individual cockpit features, when combined, are ideally suited to the role. The various mission profiles are broken down into individual tasks and the actions that each crew member will need to make are determined together with the information they will need to receive. In other words the entire interaction of the crew with the aircraft and its systems is determined for each phase of the mission or missions. These factors are often considered before entering the cockpit so that the controls and displays provided do not influence the consideration of what is required.

A thorough evaluation of all aspects of the cockpit is made on the ground before the airborne assessment is conducted. This ground assessment should be conducted in a variety of lighting conditions. If a simulator is available this is also used to reduce the amount of flight time required. It must be stressed, however, that operating the aircraft in flight, under realistic environmental and operational conditions is essential if all cockpit deficiencies are to be identified correctly. All the equipment that may be worn or carried by operational crews is used during the assessment. For example, NVG, body armour and life preservers are worn and maps, respirator cases and personal weapons are carried and stowed. It is often the case that the designer has insufficient knowledge of what clothing and equipment operational crews will use.